
DREADMOOR How to Fish: Line Tension and Reeling
DREADMOOR fishing explained: cast into splash zones, hold tension in the green, pull against the fish and use a slow lure retrieve for Harpooners.
Quick answer: Cast into a splashing zone, wait for the bite, then hold the right mouse button and keep the rod inside the green centre with A/D or mouse movement. Pull against the fish's direction, reel only when it tires, and press F to land it when it is close. Predatory fish use a different method: a slow lure retrieve with small tugs.
These inputs are from demo v0.3.39 on PC. The game supports full controller input, but the timing windows are tuned around the mouse/keyboard version.
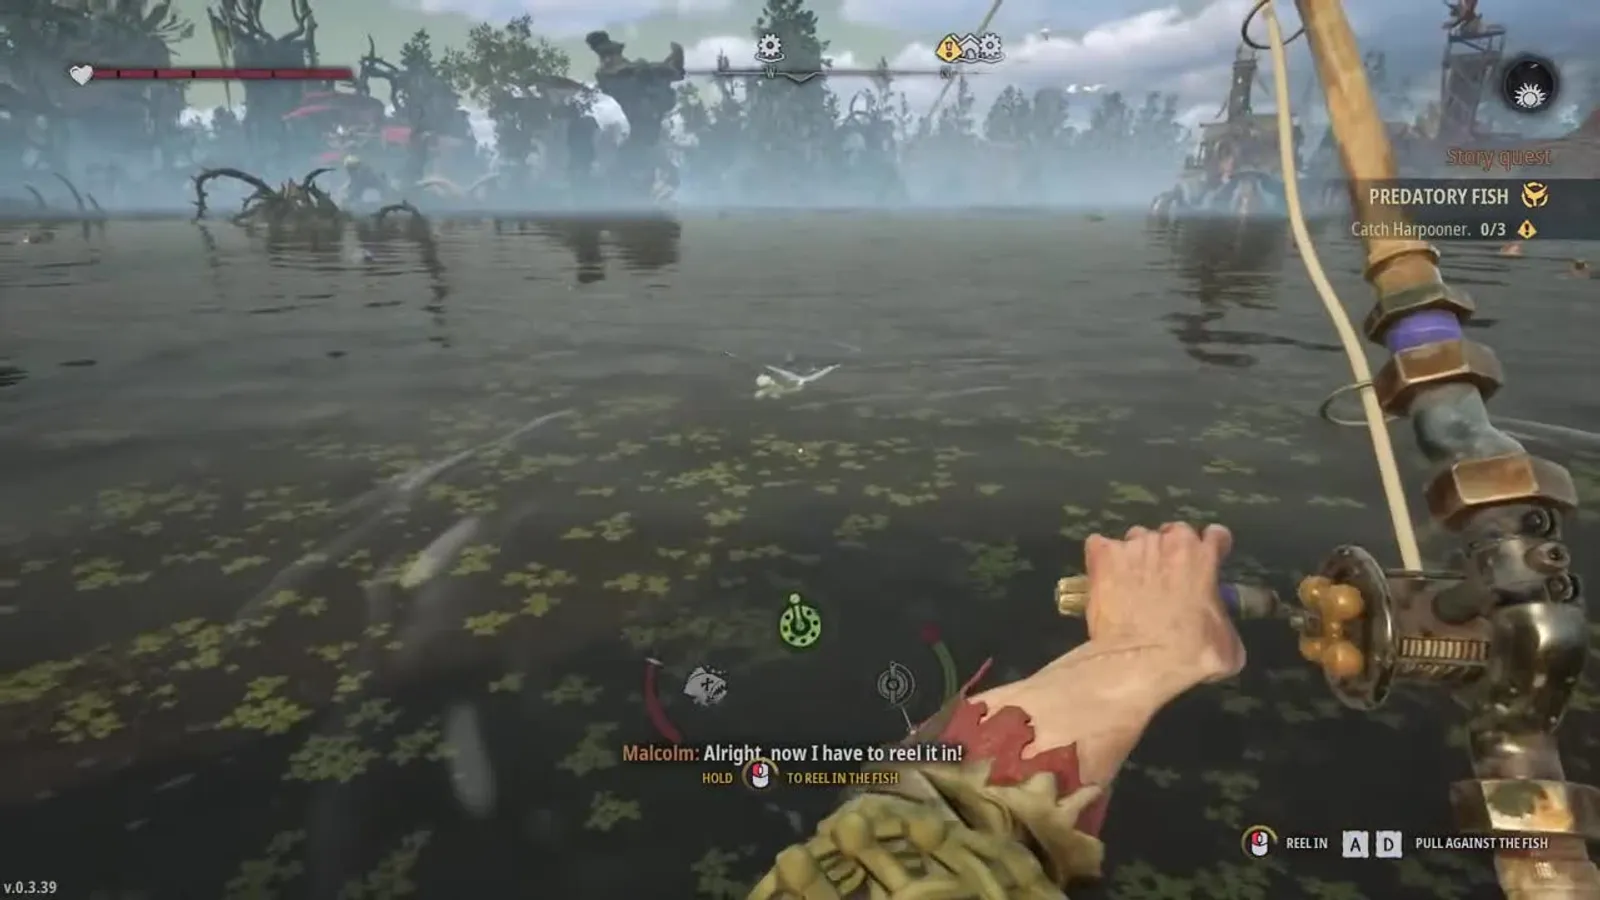
Fishing is the whole game in DREADMOOR, not a side activity. You fish to eat, to fuel the boat, to pay debts and to research better gear. The free demo is the best place to practise. The minigame is deliberately physical: the line has tension, the fish has a direction, and the rod has a green zone you have to hold. Once you understand those three things, every species becomes a variation on the same conversation.
"Skill-based fishing, survival crafting, real-time combat, and exploration through rotting wetlands define your journey." — DREADMOOR on Steam
Step 1: Find a splash zone
Fish announce themselves. Look for rings and splashes on the surface, usually near reeds, rocks or the edge of deeper water. Cast so the lure lands in or just past the splash.
Do not cast at random water and wait. The demo's fish are tied to visible activity, and empty water wastes lure durability. If a spot stops splashing after a catch, move on; it will repopulate later.
Predatory spots are marked differently. A skull icon on the water means a predatory fish is hunting there. Those fish do not take a static bait. Dream Dock splits the two fishing styles deliberately, and the tackle screen tells you which one you are set up for.
Step 2: Wait for the bite
After the cast, leave the lure alone. A fish will approach, inspect and bite. Wait for the visual and audio cue before pressing anything. Reeling early pulls the lure away from the fish.
The bite window is generous. The mistake most players make is not the wait; it is panicking when the bite comes and holding every input at once. Hold the right mouse button to set the hook, then move to the tension phase.
Step 3: Hold the green zone
The rod has a curved gauge with a green centre. Your job is to keep the marker inside it.
- Mouse and keyboard: move the mouse left and right, or use A/D if the accessibility option is enabled.
- Controller: use the left stick. Expect it to be more sensitive than the mouse.
- Do not hold the stick or mouse in one direction. The fish changes direction; you have to follow.
The gauge is not a health bar. It is a balance meter. If the marker leaves the green, tension climbs. If tension reaches the top, the line snaps and you lose the fish and the lure.
Nudge the rod back toward centre instead of slamming it across. The green zone is wide enough for small errors, but a full swing overshoots and costs more tension than it saves.
Step 4: Pull against the fish
When the fish runs right, pull left. When it runs left, pull right. The prompt at the bottom of the screen says PULL AGAINST THE FISH for a reason: matching its direction gives it slack to run.
This is the part that separates a catch from a snap. The fish is not trying to escape in a straight line; it changes direction to test you. Watch the fish, not just the gauge.
Step 5: Reel when it tires
Reeling while the fish is fresh adds tension and rarely gains much line. Wait for the run to slow, then reel. The distance counter drops as you gain line. When the fish is close enough, press F to land it.
The sequence is: survive the run, reel during the rest, repeat. A big fish may do this three or four times. If you reel continuously, you will run out of line tension before the fish runs out of energy.
Predatory fish: the slow retrieve
Harpooners and other predatory fish do not use the tension gauge in the same way. The method is:
- Cast past the splash or skull zone.
- Hold the left mouse button to retrieve the lure.
- Retrieve slowly, with small tugs, not a constant fast reel.
- If you reel too fast, the fish cannot catch up and loses interest.
- If you pause too long, the fish loses interest anyway.
- When it takes the lure, the fight begins.
The on-screen prompt reads HOLD LMB TO REEL IN THE FISH. The skill is in the pace, not in a green zone. A slow, irregular retrieve that keeps the lure moving is the reliable pattern.
Predatory fish are worth more and drop carcasses used for upgrades. The Harpooner carcass is an alternative payment for the carburettor, which is why the boat upgrade page sends you back to these spots.
Bait and lure choice
You cannot catch everything on earthworms. The demo's tackle selection screen shows Simple Rod and Wind-Up Tin as the starting combination, and the bait and lure page lists the recipes.
Three rules cover most of it:
- Earthworms are free and catch common peaceful fish such as Snapper.
- Wind-Up Tin is the first crafted lure and catches Softgazer; it needs metal plate and fish meat.
- Predatory bait is required for Harpooners and similar species. A normal lure will not trigger the predatory minigame.
Lures have durability. Check the condition before a long trip; a broken lure at a skull spot is a wasted journey.
Where to fish
The demo's reliable spots:
| Spot | What to expect |
|---|---|
| Under the starting pier | Snapper on earthworms |
| Open water near the trading post | Softgazer and common fish |
| Rocky edges and reed beds | Shovel Nose, Sharp Fin, Sturdy Crawler |
| Skull-marked water | Harpooner and other predatory fish |
| Deep water beyond the Throat | Demo boundary; not fishable |
For the species themselves, including the ones confirmed in the demo and the ones only named on the store page, see the DREADMOOR fish list.
Processing the catch
The grinder converts fish into meat and secondary materials. Softgazer yields chromatic scales, which are used in better lures. Fish meat feeds the fuel larva at the pump, producing boat fuel.
Do not process every fish. Keep the valuable ones for traders and the specific ones a blueprint requires. The money and trading page explains which catches are worth selling.
Every fish you burn for fuel is a fish you cannot sell. Early on, keep at least a few Snapper or Softgazer for the trader and convert the low-value catch.
Common fishing mistakes
Reeling a fresh fish. It adds tension and wastes the rest window. Wait for the run to end.
Fighting the gauge instead of the fish. The fish's direction tells you which way to pull. The gauge only tells you how much margin you have.
Using the wrong lure. A predatory spot with a normal lure is a wasted cast. Match the tackle to the splash.
Ignoring the line. A snapped line costs the fish and the lure. If tension is high, stop reeling and correct the angle.
Fishing without a backup. Lures break. Carry a second option before you sail far from the trading post.
FAQ
How do you fish in DREADMOOR? Cast into a splash zone, wait for the bite, hold right mouse, keep the rod in the green with A/D or mouse, pull against the fish and press F to land it.
How do you catch predatory fish in DREADMOOR? Cast past the skull-marked splash and retrieve the lure slowly with small tugs. Do not reel fast or stop for long.
Why does my line keep snapping? You are reeling while the fish is still running or holding tension at the top of the gauge. Let it run, then reel when it tires.
What is the best bait in DREADMOOR? Earthworms for common fish, Wind-Up Tin for Softgazer, and predatory bait for Harpooners. There is no single best lure for every species.
Can you fish at night? Yes, but visibility is lower and night events are more dangerous. The night guide covers the trade-off.
More DREADMOOR Guides
A spoiler-light DREADMOOR beginner guide: what to do first, which materials to grab, how to fish, and the mistakes that waste your opening hours.
Who's who in DREADMOOR: Malcolm, Colin, Gil, Boza, John the Fifth, Betsy, Keeper Lilo and the Baron, and what each one does.
DREADMOOR controls for PC and controller: movement, fishing, boat handling, inventory and the keys the demo does not explain clearly.
DREADMOOR is single-player only. Steam lists no co-op or multiplayer mode, and the boat, story and economy are built around one angler.
How DREADMOOR crafting works: the workbench, blueprint research, scraps of knowledge, material sources and the recipes worth making first.
A complete DREADMOOR demo walkthrough: the radio, five Snapper, John's still, the dry dock, the engine and the Throat gate puzzle, step by step.
DREADMOOR Early Access starts 9 November 2026 with the full core loop and one major region. What is in the build, how long it will last and whether to buy.
Every DREADMOOR location confirmed in the demo, from the Slough and Angler's Island to the Throat, plus how the map and fast travel work.